截图清晰度 截图处理 由于笔记截图需要缩放以适应预览视图,所以截图时会出现不清晰的问题。故我们需要用笔记截图的原数据进行渲染绘制。
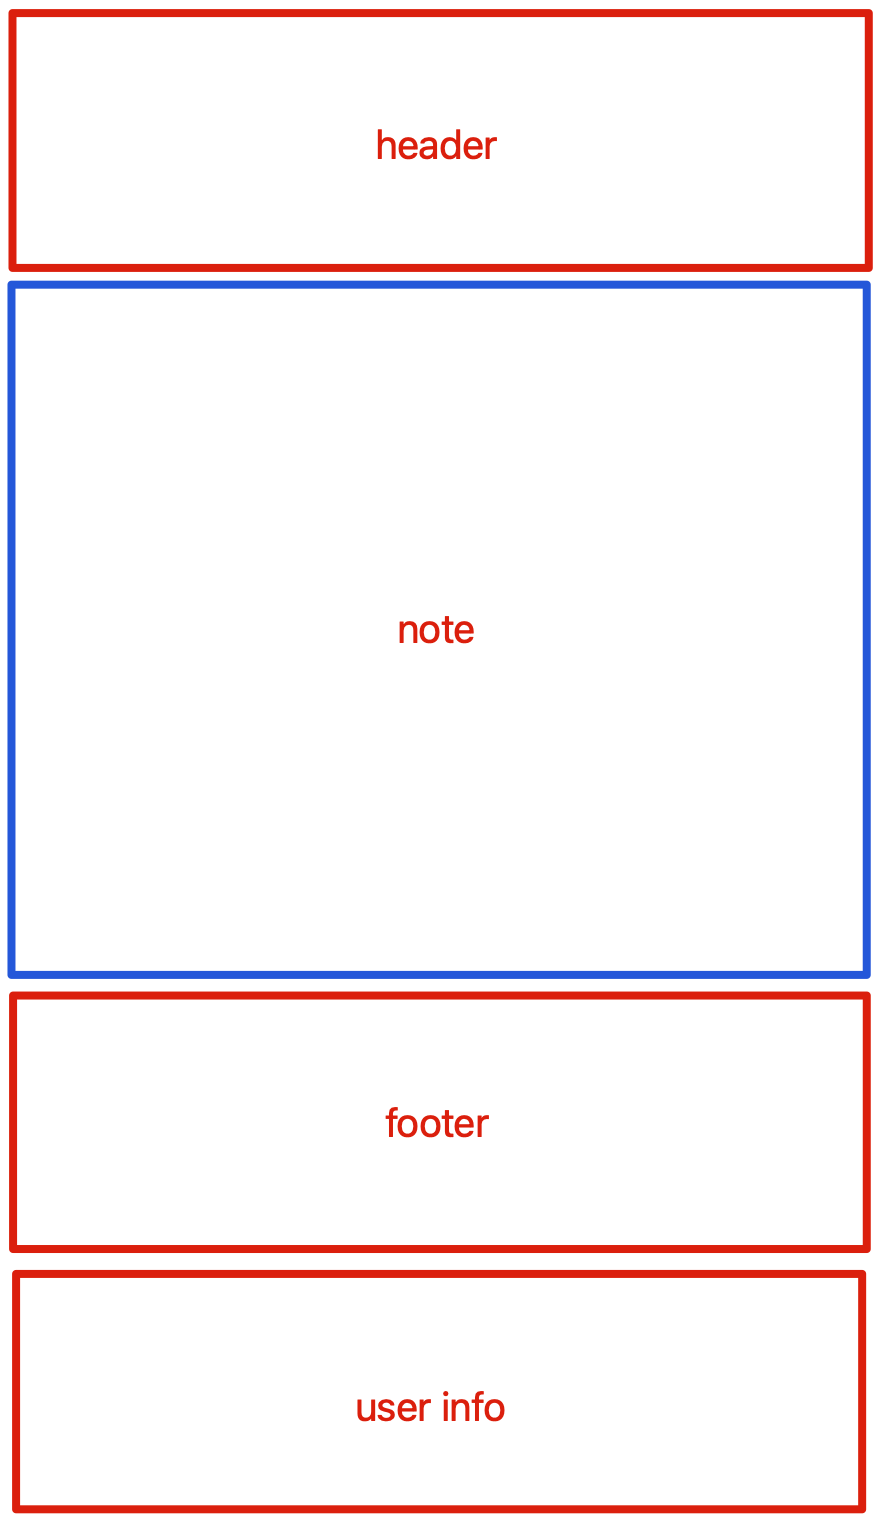
我们将预览视图分为四大块儿进行处理,分别为,header,note,footer,user info,因为 header 和 footer 只有在设置主题的情况下才可能存在,所以需要将 header,footer 和 user info 分别处理。如下图:
预览视图分区示意
我们将分别截取 header,footer,user info。note 的截图直接使用 pdfDataAndForcePDFAttachments(toRender: Bool) 生成的 image 数据即可,这样可以保持图片的最高清晰度。
我们对 note 截图进行放大两倍绘制,这样就能非常高清。视网膜屏幕截图的像素宽高默认为图片 size 的两倍。我们这里没有使用 lockFocus() 和 unlockFocus() 方法,是因为这个方法的绘制与当前显示器有关,如果显示器设备不是视网膜屏那么绘制出来的图像则并不清晰。所以我们调用 NSBitmapImageRep 手动创建图像的 bitmap 数据,然后使用 NSGraphicsContext 相关方法进行最终图片的 bitmap 数据生成。
对 header,footer 和 user info 三块儿的截图我们需要将其等比放大到与 note 截图等宽大小,相当于这三块儿内容也进行了放大两倍处理,这样最终效果就会非常清晰。
1 2 3 4 5 6 7 8 9 10 11 12 13 14 15 16 17 18 19 20 21 22 23 24 25 26 27 28 29 func screenShot (scale : CGFloat = 1 ) -> NSImage ? { guard scale > 0 else { return nil } let targetSize = NSSize (width: bounds.width * scale, height: bounds.height * scale) guard let bitmapRep = NSBitmapImageRep (bitmapDataPlanes: nil , pixelsWide: Int (targetSize.width), pixelsHigh: Int (targetSize.height), bitsPerSample: 8 , samplesPerPixel: 4 , hasAlpha: true , isPlanar: false , colorSpaceName: .calibratedRGB, bytesPerRow: 0 , bitsPerPixel: 0 ) else { return nil } NSGraphicsContext .saveGraphicsState() guard let graphicsContext = NSGraphicsContext (bitmapImageRep: bitmapRep) else { return nil } NSGraphicsContext .current = graphicsContext graphicsContext.cgContext.scaleBy(x: scale, y: scale) self .displayIgnoringOpacity(bounds, in: graphicsContext) NSGraphicsContext .restoreGraphicsState() let result = NSImage (size: bitmapRep.size) result.addRepresentation(bitmapRep) return result }
主题处理 当我们设置主题时,最终效果会有一个背景色的添加。此时我们需要对 note 截图 image 数据进行处理,为其添加相应的背景色,代码如下:
1 2 3 4 5 6 7 8 9 10 11 12 13 14 15 16 17 18 19 20 21 22 23 24 25 26 27 28 29 30 convenience init (color : NSColor , img : NSImage , size : NSSize ) { guard let bitmapRep = NSBitmapImageRep (bitmapDataPlanes: nil , pixelsWide: Int (size.width), pixelsHigh: Int (size.height), bitsPerSample: 8 , samplesPerPixel: 4 , hasAlpha: true , isPlanar: false , colorSpaceName: .calibratedRGB, bytesPerRow: 0 , bitsPerPixel: 0 ) else { self .init (size: size) return } NSGraphicsContext .saveGraphicsState() NSGraphicsContext .current = NSGraphicsContext (bitmapImageRep: bitmapRep) color.drawSwatch(in: NSRect (origin: .zero, size: size)) img.draw(in: NSRect (origin: .zero, size: size), from: .zero, operation: .sourceOver, fraction: 1 ) NSGraphicsContext .restoreGraphicsState() self .init (size: size) self .addRepresentation(bitmapRep) }
水印处理 当我们设置了水印时,我们先将水印进行截图。然后绘制到最终的效果图上,绘制的 operation 参数一定要是 .sourceOver 类型,如果用 .copy 将会覆盖住最终截图,就好像水印背景并非透明一般。
最终代码如下:
1 2 3 4 5 6 7 8 9 10 11 12 13 14 15 16 17 18 19 20 21 22 23 24 25 26 27 28 29 30 31 32 33 34 35 36 37 38 39 40 41 42 43 44 45 46 47 48 49 50 51 52 53 54 55 56 57 58 59 60 61 62 63 64 65 66 67 68 69 70 71 72 73 74 75 76 77 78 79 80 81 func screenshot () -> NSBitmapImageRep ? { var color = NSColor .white if let bgImage = theme? .bgImage { color = NSColor (patternImage: bgImage) } let noteSize = NSSize (width: noteScreenshot.size.width * 2.0 , height: noteScreenshot.size.height * 2.0 ) let noteImage = NSImage (color: color, img: noteScreenshot, size: noteSize) let scale = noteSize.width / bounds.width var headerImage: NSImage ? if headerHeight > 0 , let image = headerView.screenShot(scale: scale) { headerImage = NSImage (color: color, img: image, size: image.size) } var footerImage: NSImage ? if footerHeight > 0 , let image = footerView.screenShot(scale: scale) { footerImage = NSImage (color: color, img: image, size: image.size) } var userInfoImage: NSImage ? if let image = userInfoShowView.screenShot(scale: scale) { userInfoImage = NSImage (color: color, img: image, size: image.size) } let watermarkImage = watermarkView? .screenShot(scale: scale) let width = noteImage.size.width let headerHeight = headerImage? .size.height ?? 0 let footerHeight = footerImage? .size.height ?? 0 let userInfoHeight = userInfoImage? .size.height ?? 0 let noteHeight = noteImage.size.height let height = headerHeight + noteHeight + footerHeight + userInfoHeight let targetSize = NSSize (width: width, height: height) guard let bitmapRep = NSBitmapImageRep (bitmapDataPlanes: nil , pixelsWide: Int (targetSize.width), pixelsHigh: Int (targetSize.height), bitsPerSample: 8 , samplesPerPixel: 4 , hasAlpha: true , isPlanar: false , colorSpaceName: .calibratedRGB, bytesPerRow: 0 , bitsPerPixel: 0 ) else { return nil } NSGraphicsContext .saveGraphicsState() guard let context = NSGraphicsContext (bitmapImageRep: bitmapRep) else { return nil } NSGraphicsContext .current = context if let userInfoImage = userInfoImage { let userInfoRect = NSRect (x: 0 , y: 0 , width: width, height: userInfoHeight) userInfoImage.draw(in: userInfoRect, from: .zero, operation: .copy, fraction: 1.0 ) } if let footerImage = footerImage { let footerRect = NSRect (x: 0 , y: userInfoHeight, width: width, height: footerHeight) footerImage.draw(in: footerRect, from: .zero, operation: .copy, fraction: 1.0 ) } let noteRect = NSRect (x: 0 , y: userInfoHeight + footerHeight, width: width, height: noteHeight) noteImage.draw(in: noteRect, from: .zero, operation: .copy, fraction: 1.0 ) if let headerImage = headerImage { let headerRect = NSRect (x: 0 , y: userInfoHeight + noteHeight + footerHeight, width: width, height: headerHeight) headerImage.draw(in: headerRect, from: .zero, operation: .copy, fraction: 1.0 ) } if let watermarkImage = watermarkImage { let watermarkRect = NSRect (origin: .zero, size: targetSize) watermarkImage.draw(in: watermarkRect, from: .zero, operation: .sourceOver, fraction: 1.0 ) } NSGraphicsContext .restoreGraphicsState() return bitmapRep }
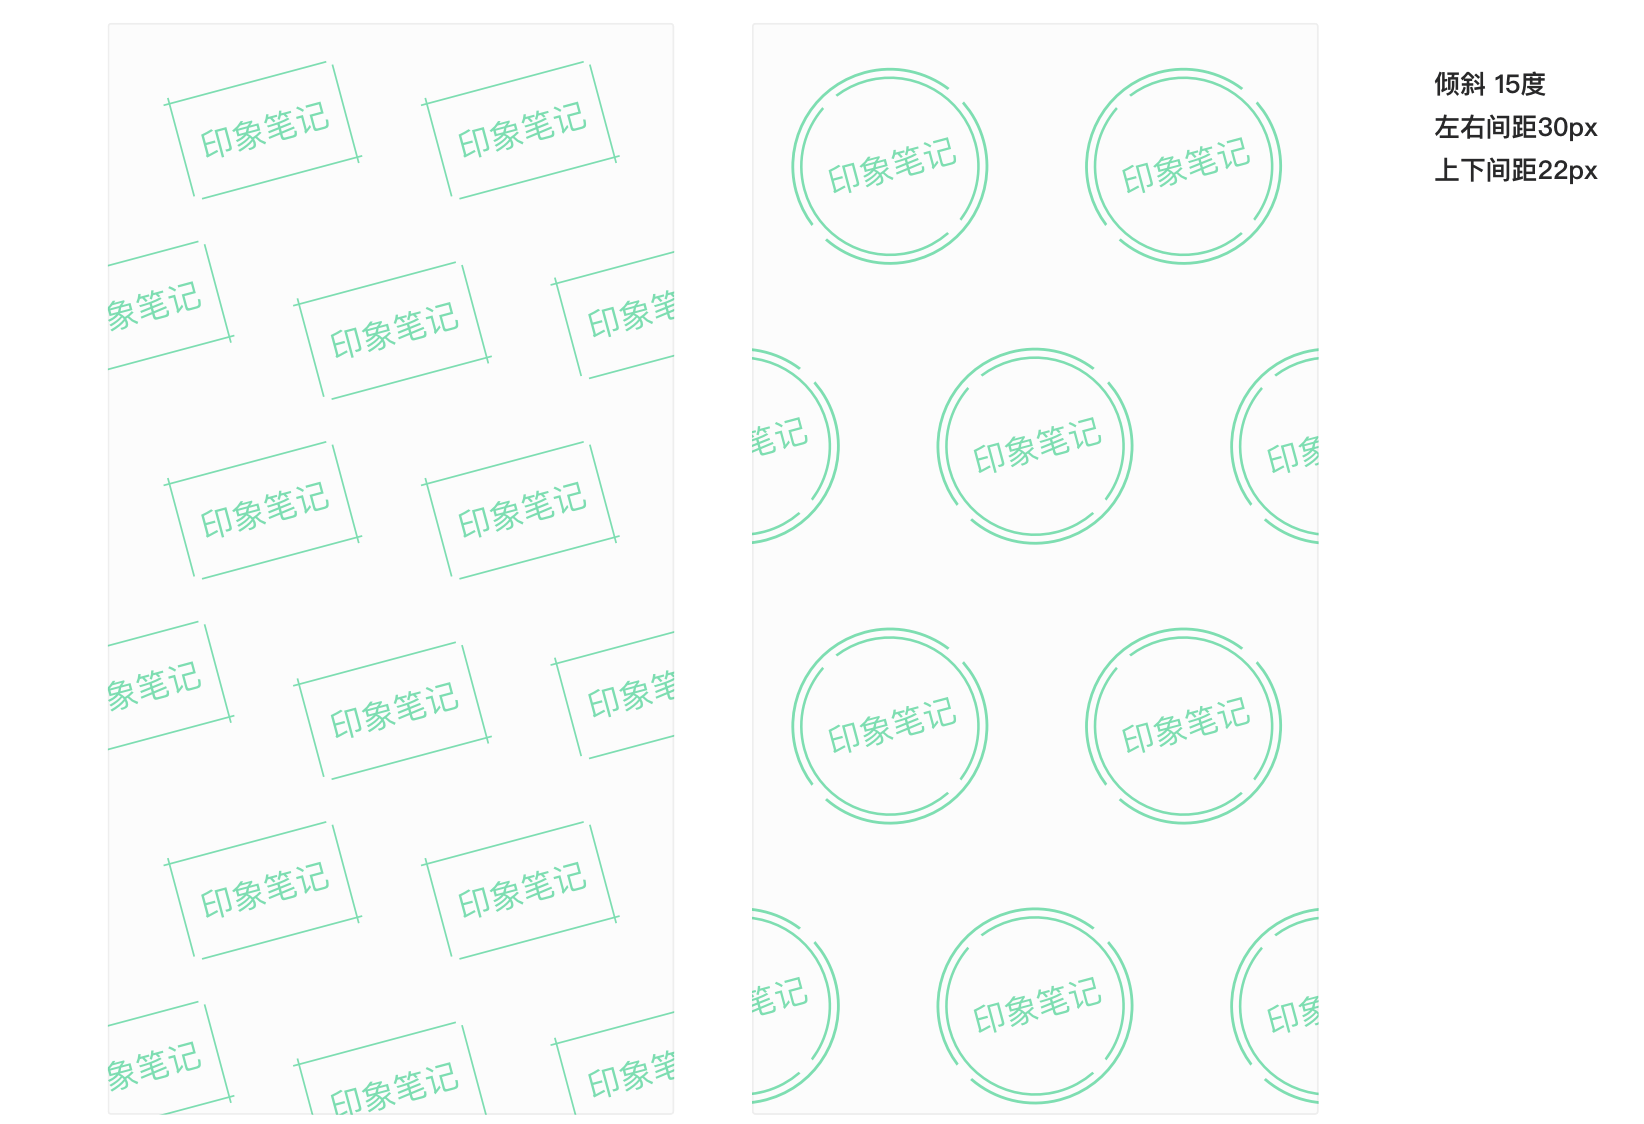
矩形水印旋转后的间距计算 设计师所给的水印旋转效果如下图:
由于圆形无论怎么旋转,间距是不会变的,所以我们这里可以忽略对圆形水印的间距重计算。矩形旋转之后,对矩形四个顶点做一个外切矩形,外切矩形的宽高是有相应的变化,所以我们需要重新计算矩形的间距。
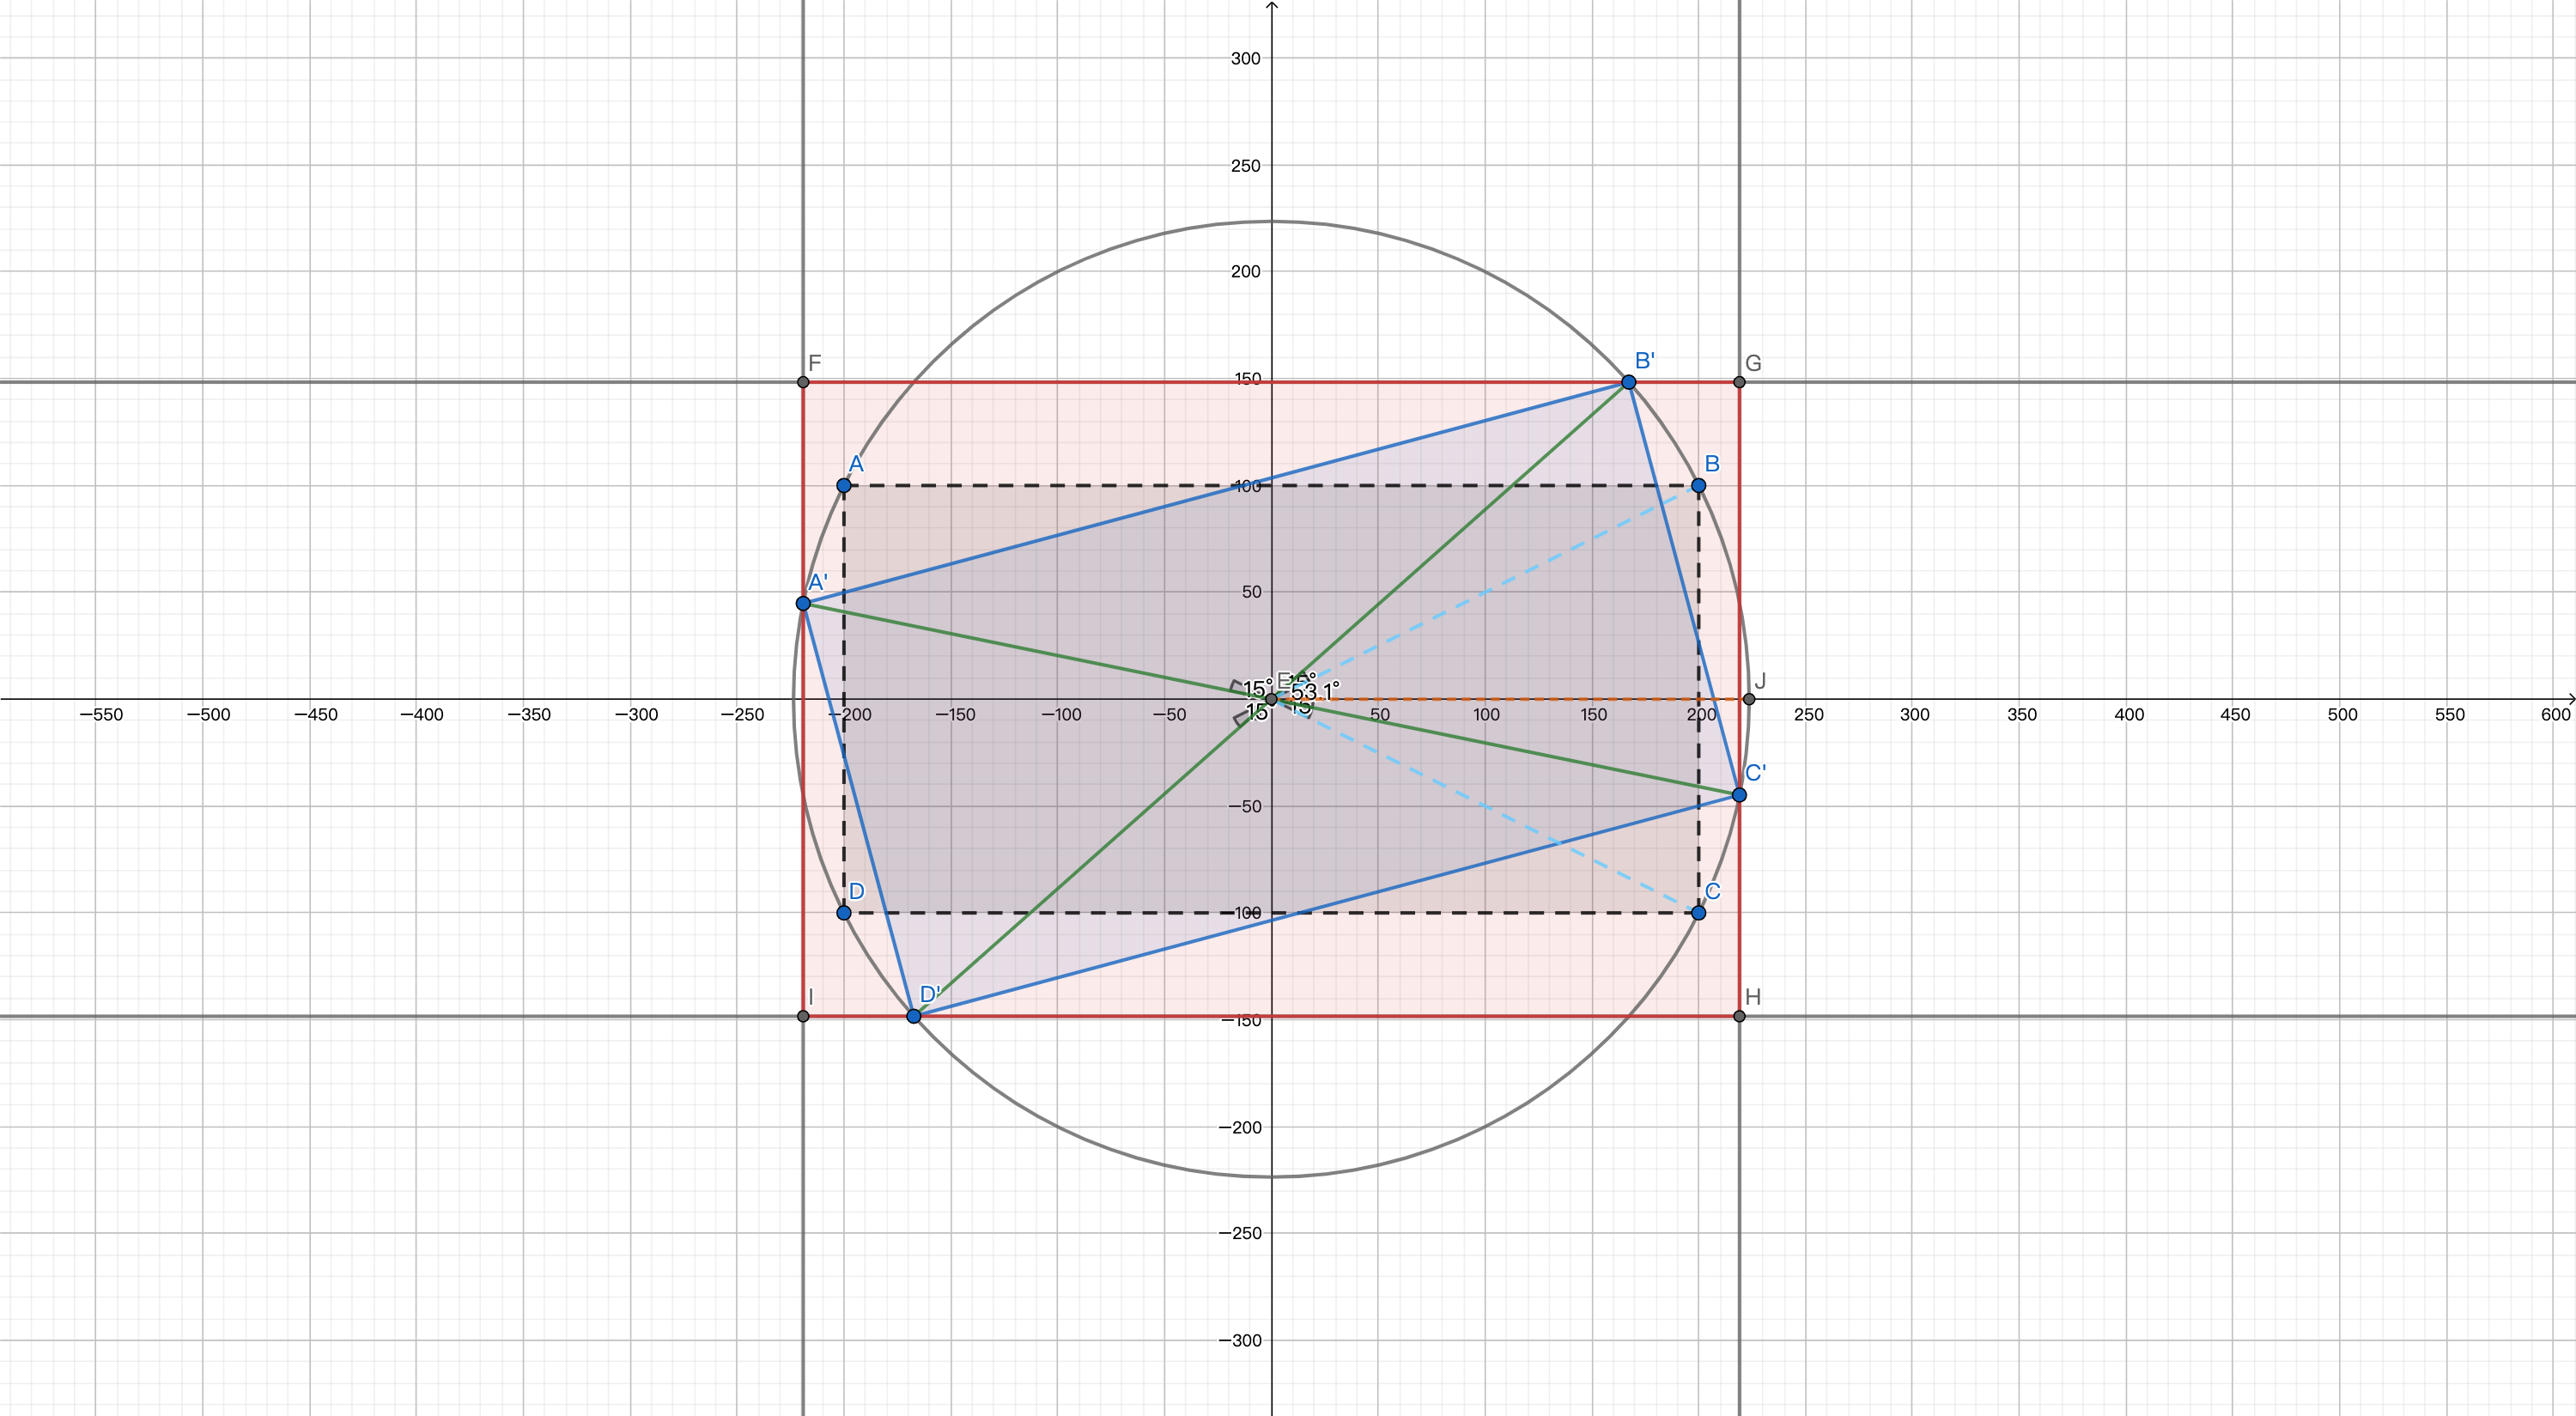
假设我们以矩形的对角线交点为圆心,画一个外切圆,矩形无论怎么绕着中心点旋转,四个顶点一定在这个外切圆上,并且对角线长度即为这个外切圆的直径(d),从而我们可得外切圆的半径(r)。圆的中心我们作为平面直角坐标系的中心点(0,0),那么我们可以知道矩形四个顶点的坐标。由四个顶点的坐标我们可以算出 d 和 r。根据相应的余弦定理和圆上坐标公式可得旋转后图形的顶点坐标,从而可以计算出旋转之后矩形。然后我们就计算出相应的间距即可。几何坐标表示如下:
图中 ABCD 灰色区域是起始位置,A’B’C’D’ 是逆时针旋转 15° 之后的我们展示水印的位置,灰色的圆为以对角线交点 E 为圆心,对角线长为直径的圆,红色的 FGHI 为旋转 15° 后的外切矩形,也即需要我们计算出宽高的矩形。
首先我们可得 ABCD 四个点的坐标,我们利用 D(xd, yd),B(xb, yb) 两点间距离公式可计算出圆的直径 d,进而可得圆的半径 r。两点间距离公式如下:
我们的最终目标是求出 B‘ 的 y 坐标和 C’ 的 x 坐标,y * 2 即为红色矩形的高,x * 2 即为红色矩形的宽。
因为 B’ 和 C‘ 都在外切圆上,所以利用外切圆的坐标公式即可求出两点坐标,圆上点的坐标公式如下:
圆心 E 的坐标(x0,y0)、半径为r、角度为 angle。
1
2
x1 = x0 + r * cos(angle * PI / 180) y1 = y0 + r * sin(angle * PI / 180)
由公式可知,要想算出 B’ 和 C‘ 坐标,我们需要知道角度 angle。角度的起始位置(0°)为 EJ,所以我们需要计算的角度为 ∠B’EJ(以下称为 α) 和 ∠JEC‘(以下称为 β)。
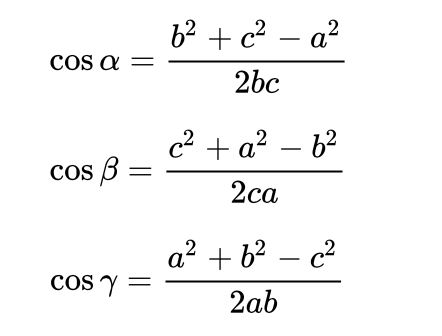
α 的角度计算 通过图我们可知,α 的大小为等腰三角形 △BEC 两腰的夹角 ∠BEC(以下称为 γ) 的一半再加上 15°。也即 ∠B‘EB + ∠BEJ。两腰的夹角我们可以通过余弦定理算出。余弦定理公式如下:
假设等腰三角形的角为 γ 此时我们可以计算出 cos弧度 的值(macOS 中的旋转是以弧度为单位)。然后我们利用弧度与角度换算公式可知:
1
2
弧度与角度换算公式:1° = π / 180 cos弧度 = cos(γ * PI / 180)
故,具体的角度我们可以用反三角函数 acos 算出。计算方式如下:
1 γ = acos(cos弧度) / (.pi / 180)
旋转角度知道后就可以计算出 B’ 的 y 坐标
1 y = r * sin((γ / 2 + rotationAngle) * .pi / 180)
所以红色矩形的高为 2 * y。
β 的角度计算 C‘ 我们可以看成是 J 顺时针旋转一定的角度得到。则 β 为等腰三角形 △BEC 两腰的夹角 ∠BEC 减去 15° 得到。等腰三角形的夹角 γ 我们已算出,所以 C’ 的 x 坐标我们也很容易得到:
1
2
β = -(γ / 2 - rotationAngle) // 顺时针为负数 x = r * cos(β * .pi / 180)
所以红色矩形的宽为:2 * x
完整计算代码如下:
1 2 3 4 5 6 7 8 9 10 11 12 13 14 15 16 17 18 19 20 21 22 23 24 25 26 27 28 29 30 31 32 33 34 35 36 37 38 39 40 41 42 43 44 func getReal (size watermarkSize : CGSize , angle rotationAngle : CGFloat ) -> CGSize { var realSize = CGSize .zero if watermarkSize.width != watermarkSize.height { let rightTop = CGPoint (x: watermarkSize.width / 2 , y: watermarkSize.height / 2 ) let leftBottom = CGPoint (x: - watermarkSize.width / 2 , y: - watermarkSize.height / 2 ) let r = sqrt(pow(rightTop.x - leftBottom.x, 2 ) + pow(rightTop.y - leftBottom.y, 2 )) / 2 let cosRadians = (pow(r, 2 ) * 2 - pow(watermarkSize.height, 2 )) / (2 * r * r) let angle = acos(cosRadians) / (.pi / 180 ) let rightTopY = r * sin((angle / 2 + rotationAngle) * .pi / 180 ) let newHeight = rightTopY * 2 let rightBottomRotateAngle = - (angle / 2 - rotationAngle) let rightBottomX = r * cos(rightBottomRotateAngle * .pi / 180 ) let newWidth = rightBottomX * 2 realSize = CGSize (width: newWidth, height: newHeight) } else { realSize = watermarkSize } return realSize }